Disaster Recovery with Azure NetApp Files, JetStream DR and AVS
Disaster Recovery to cloud is a resilient and cost-effective way of protecting the workloads against site outages and data corruption events (e.g., ransomware). Leveraging the VMware VAIO framework, on-premises VMware workloads can be replicated to Azure Blob storage and recovered with minimal or close to no data loss and near-zero RTO. JetStream DR can seamlessly recover workloads replicated from on-premises to AVS and specifically to Azure NetApp Files. It enables cost-effective disaster recovery by consuming minimal resources at the DR site and using cost-effective cloud storage. JetStream DR automates recovery to ANF datastores via Azure Blob Storage and can recover independent VMs or groups of related VMs into the recovery site infrastructure according to network mapping. It also provides point-in-time recovery for ransomware protection.
High Level Steps
- Install JetStream DR software in the on-premises data center:
- Download the JetStream DR software bundle from Azure Marketplace (ZIP) and deploy the JetStream DR MSA (OVA) in the designated cluster.
- Configure the cluster with the IO filter package (install JetStream VIB).
- Provision Azure Blob (Azure Storage Account) in the same region as the DR AVS cluster.
- Deploy DRVA appliances and assign replication log volumes (VMDK from existing datastore or shared iSCSI storage).
- Create protected domains (groups of related VMs) and assign DRVAs and Azure Blob Storage/ANF.
- Start protection.
- Install JetStream DR software in the Azure VMware Solution private cloud:
- Use the Run command to install and configure JetStream DR.
- Add the same Azure Blob container and discover domains using the Scan Domains option.
- Deploy required DRVA appliances.
- Create replication log volumes using available vSAN or ANF datastores.
- Import protected domains and configure RocVA (recovery VA) to use ANF datastore for VM placements.
- Select the appropriate failover option and start continuous rehydration for near-zero RTO domains/VMs.
- During a disaster event, trigger failover to Azure NetApp Files datastores in the designated AVS DR site.
- Invoke failback to the protected site after protected site has been recovered.
Before starting, ensure the pre-requisites are met as indicated in this link and also run the Bandwidth Testing Tool (BWT) provided by JetStream Software to evaluate the potential performance of Azure Blob storage and its replication bandwidth when used with JetStream DR software. Once the pre-requisites, including connectivity, are in place, set up and subscribe to JetStream DR for AVS from Azure Marketplace. After the software bundle is downloaded, proceed with the installation process described above.
Scalability Recommendations
When planning and starting protection for a large number of VMs (e.g., 100+), the Capacity Planning Tool (CPT) from the JetStream DR Automation Toolkit should be used. A list of VMs to be protected is provided together with their RTO and recovery group preferences and then CPT is run.
CPT performs the following:
- Combines VMs into protection domains according to their RTO.
- Defines the optimal number of DRVAs and their resources.
- Estimates required replication bandwidth.
- Identifies replication log volume characteristics (capacity, bandwidth, etc.).
- Estimates required object storage capacity, and more…
Note: The number and content of domains prescribed depend upon various VMs’ characteristics such as average IOPS, total capacity, priority (that defines failover order), RTO, and others.
CPT is run when needed at the protected and recovery sites to generate plans for: start protection, start continuous failover, start failover, and start failback. CPT also contains plan execution scripts to launch plans at appropriate times. CPT is an essential DR automation tool designed to minimize an administrator’s efforts when protecting a substantial number of VMs.
Install JetStream DR in On-Premises Datacenter
JetStream DR software consists of three major components: JetStream DR Management Server Virtual Appliance (MSA), DR Virtual Appliance (DRVA), and host components (IO Filter packages). The MSA is used to install and configure host components on the compute cluster and then to administer JetStream DR software. The installation process is:
- Check prerequisites.
- Run the Capacity Planning Tool for resource and configuration recommendations (optional but recommended for proof-of-concept trials).
- Deploy the JetStream DR MSA to a vSphere host in the designated cluster.
- Launch the MSA using its DNS name in a browser.
- Register the vCenter server with the MSA.
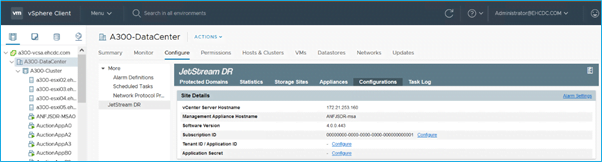
After JetStream DR MSA has been deployed and the vCenter Server has been registered, access the JetStream DR plug-in using the vSphere Web Client.
- Access the JetStream DR plugin (Datacenter > Configure > JetStream DR).
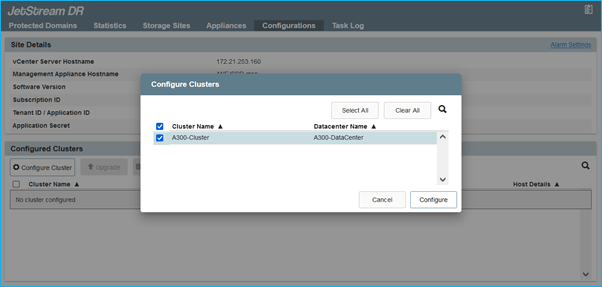
- From the JetStream DR interface, configure the cluster with the IO filter package.
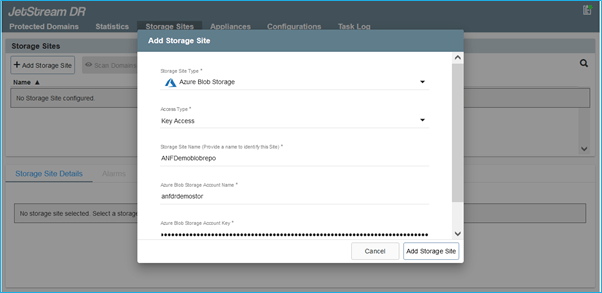
- Add Azure Blob Storage located at the recovery site.
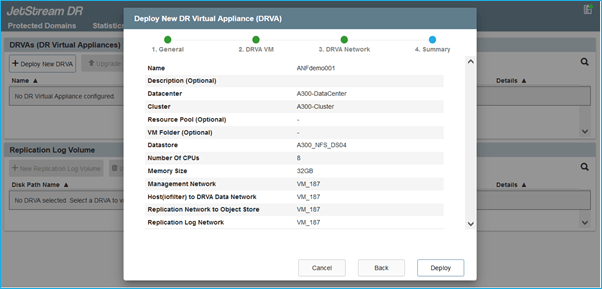
- Deploy a DR Virtual Appliance (DRVA) from the Appliances tab.
Note: DRVAs can be automatically created by CPT but for POC trials we recommend configuring and running the DR cycle manually (start protection –> failover –> failback).
The JetStream DRVA is a virtual appliance that facilitates key functions in the data replication process. A protected cluster must contain at least one DRVA, and typically one DRVA is configured per host. Each DRVA can manage multiple protected domains.
- In this example, 4 DRVA’s were created for 80 virtual machines:
- Create replication log volumes for each DRVA using VMDK from the datastores available or independent shared iSCSI storage pool.
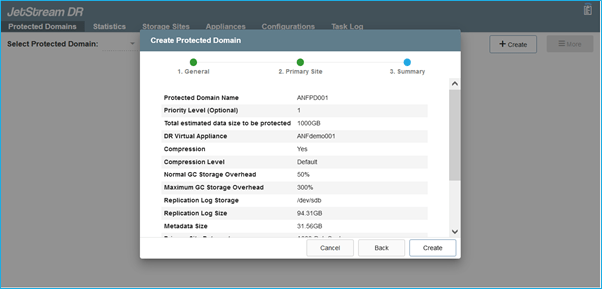
- From the Protected Domains tab create the required number of protected domains using information about the Azure Blob Storage site, DRVA instance, and replication log. A protected domain defines a specific VM or set of VMs within the cluster that will be protected together and assigned a priority order for failover/failback operations.
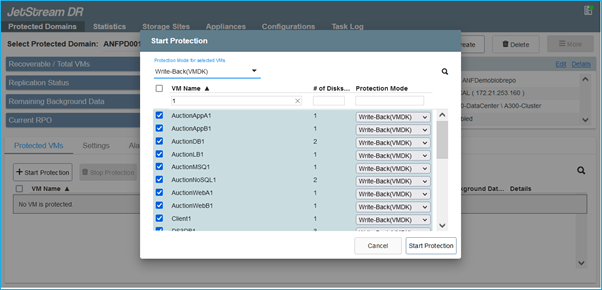
- Select VMs you want to protect and start VM protection of the protected domain. This will begin data replication to the designated Blob Store.
Notes: (1) Ensure same protection mode is used for all VMs in a protected domain. (2)“Write-Back(VMDK)” mode can offer higher performance.
- Ensure replication log volumes are placed on high performance storage.
Note: Failover run books can configured to group the VMs (called Recovery Group), set boot order sequence, and modify the CPU/memory settings along with IP configurations.
Install JetStream DR for AVS in an Azure VMware Solution Private Cloud using the Run Command
A best practice for a recovery site (AVS) is to create a 3-node pilot-light cluster in advance. This allows the recovery site infrastructure to be pre-configured, including:
- Destination networking segments, firewalls, services like DHCP and DNS, etc.
- Installation of JetStream DR for AVS
- Configuration of ANF volumes as datastores, and more
JetStream DR supports near-zero RTO mode for mission critical domains. For these domains, destination storage should be pre-installed. ANF is a recommended storage type in this case.
Note: Network configuration including segment creation should be configured on the AVS cluster to match on-premises requirements.
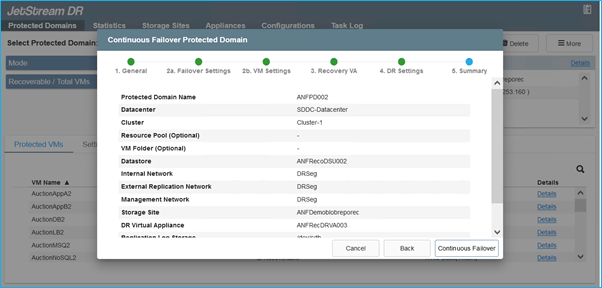
Depending on the SLA and RTO requirements, continuous failover or regular (standard) failover mode can be used. For near-zero RTO, continuous rehydration should be started at the recovery site.
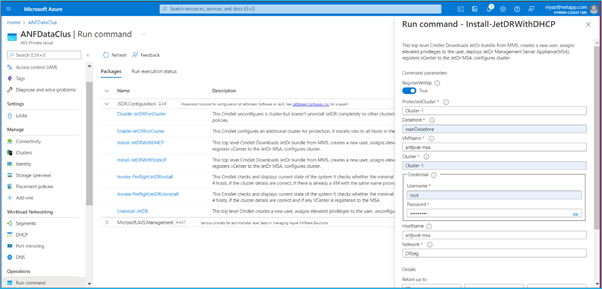
To install JetStream DR for AVS on an Azure VMware Solution private cloud, use the Run command. From the Azure portal, go to Azure VMware solution, select the private cloud and select Run command > Packages > JSDR.Configuration.
Note: The default CloudAdmin user in Azure VMware Solution doesn’t have sufficient privileges to install JetStream DR for AVS. Azure VMware Solution enables simplified and automated installation of JetStream DR by invoking the Azure VMware Solution Run command for JetStream DR.
- The below screenshot shows installation using a DHCP-based IP address.
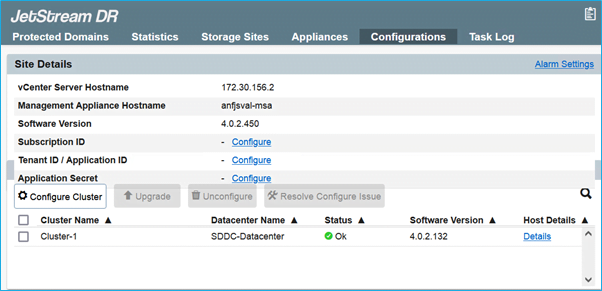
- Once JetStream DR for AVS installation is complete, refresh the browser. To access the JetStream DR UI, go to SDDC Datacenter > Configure > JetStream DR.
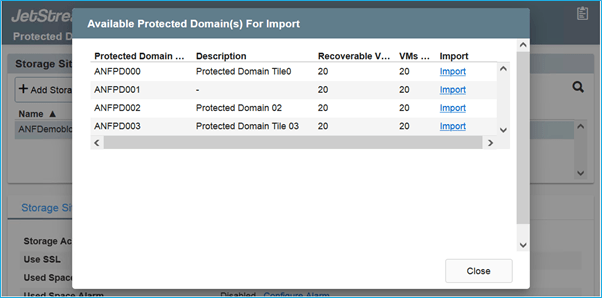
- From the JetStream DR interface, add the Azure Blob Storage account that was used to protect the on-premises cluster as a storage site then run the Scan Domains option.
- Once the protected domains are imported, deploy DRVA appliances. In this example, continuous rehydration is started manually from the recovery site using the JetStream DR UI.
Note: These steps can also be automated using CPT created plans.
- Create replication log volumes using available vSAN or ANF datastores.
- Import the protected domains and configure the Recovery VA to use ANF datastore for VM placements.
Note: Ensure DHCP is enabled on the selected segment and enough IPs are available. Dynamic IPs are temporarily used while domains are recovering. Each recovering VM (including continuous rehydration) requires an individual dynamic IP. After recovery is complete, the IP is released and can be reused.
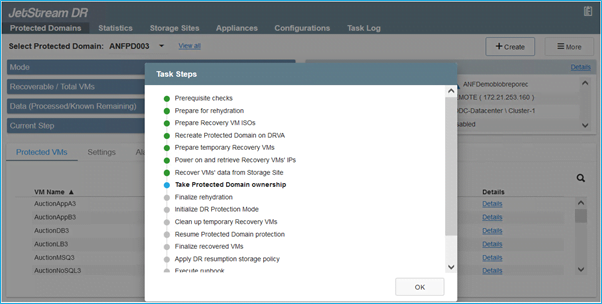
- Select the appropriate failover option (continuous failover or failover). In this example, continuous rehydration (continuous failover) is selected.
Failover and Failback
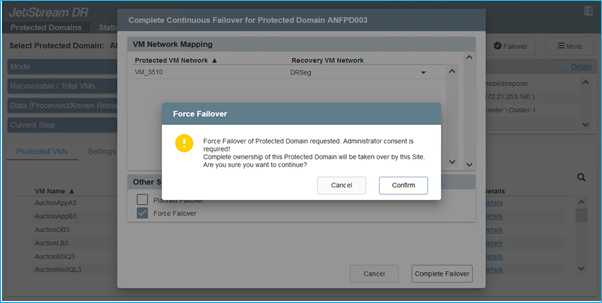
For a planned or forced failover, follow these steps:
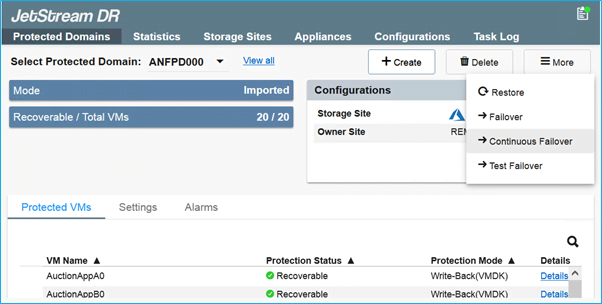
- Once a disaster occurs in the protected cluster of the on-premises environment (partial or full failure), trigger the failover.
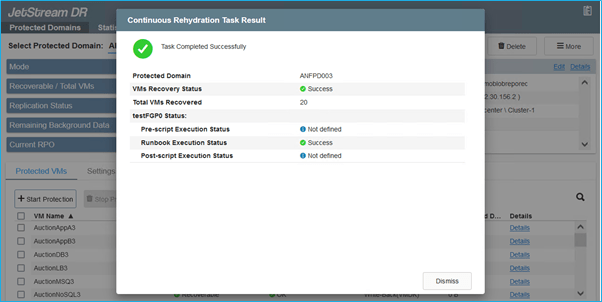
Notes: (1) CPT can be used to execute the failover plan to recover the VMs from Azure Blob Storage into the AVS cluster recovery site. (2) After failover (for continuous or standard rehydration) when the protected VMs have been started in AVS, protection is automatically resumed and JetStream DR continues to replicate their data into the appropriate/original containers in Azure Blob Storage.
- The task bar shows progress of failover activities.
- When the task is complete, access the recovered VMs and business continues as normal.
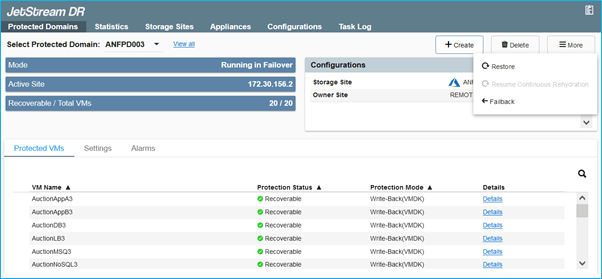
- After the primary site is up and running again, failback can be performed. VM protection will be resumed and data consistency should be checked:
- Restore the on-premises environment. Depending upon the type of the disaster incident, it may be necessary to restore and/or verify the configuration of the protected cluster. If necessary, JetStream DR software may need to be reinstalled.
Note: The recovery_utility_prepare_failback script provided in the Automation Toolkit can be used to help clean the original protected site of any obsolete VMs, domain information, etc.
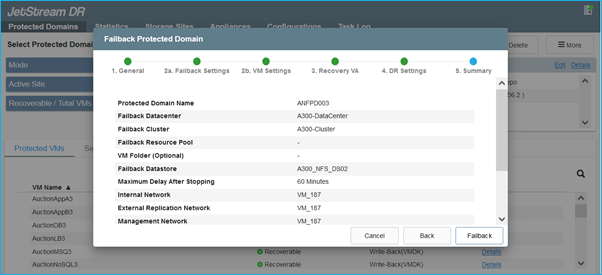
- Access the restored on-premises environment, go to the Jetstream DR UI, and select the appropriate protected domain. Once the protected site is ready for failback, select the Failback option in the UI.
Notes: (1) The CPT generated failback plan can also be used to initiate the return of the VMs and their data from the object store to back to the original VMware environment. (2) Specify Maximum delay after pausing VMs in recovery site and restarting in protected site. This time includes completing replication after stopping failover VMs, time to clean recovery site and recreate VMs in protected site. Recommended value is 10 min.
- Complete the failback process then confirm resume VM protection and data consistency.
Ransomware Recovery
Recovering from ransomware can be a daunting task. Specifically, it can be hard for IT organizations to pin-point what the “safe point of return is” and once determined, how to ensure that recovered workloads are safeguarded from the attacks re-occurring (from sleeping malware or through vulnerable applications).
JetStream DR for AVS together with Azure NetApp Files datastores can address these concerns by allowing organizations to recover from available points-in-time; ensuring workloads are recovered to a functional and isolated network if required, allowing applications to function and communicate with each other, while not exposing them to any North-South traffic, giving security teams a safe place to perform forensics, and so on.